Friday, April 30, 2010

chicken dinner cupcakes

Gravy anyone?
Caramel syrup better yet.

NEEDS:
Runts (for the peas)
Starbursts (yellow for the corn & butter, orange for the carrots)
Caramel ice cream topping
2 tubs of vanilla frosting
2 cups of cornflakes, crumbled
Lg. marshmallows
White airheads for the bones

These cupcakes are hilariously delicious! Nothing like saying "I'll bring dessert...ya know- potatoes & gravy, vegtables and chicken!" They definately don't disappoint. I started with the peas and carrots. Frost your cupcake with a green frosting, then cover with runts and 2 quarter cut starbursts. Easy, right?
Next up- the corn. Cut up starburst into little bits, shape them into kernal shape and press on to a yellow frosted cupcake. My two year-old was begging to eat these yummy looking veggies.
Next on the menu- FRIED CHICKEN!
Begin by putting 2 cups of corn flakes in a food processor, until roughly chopped. Take one cupcake, put a good size dot of frosting in the middle, to hold your marshmallow in place. I used a toothpick as well to secure it. Then frost the cupcake, beginning at the base and then in around the mallow. It doesn't need to look pretty- you'll then coat it in the cornflakes.
Once they are coated, set them aside in the refrigerator until you are about ready to serve. It will help the frosting set up and not slide.  The bone is made by cutting the airheads in half, and molding the top into a heart shape. Then cut a slit in the top of the marshmallow and carefully place it in. Lastly- my personal favorite- the potatoes & gravy.
Easy as can be- just frost, make a good size hole in the middle, fill it with syrup and put a nice slice of starburst on the top. These were the tastiest little things...no salt and pepper needed! I purchased an inexpensive foil muffin tin to serve up these yummy creations. They were a hit and perfect for any occasion!  

*WE'RE HALFWAY THERE!*
Our followers grow every day- but we still need more!
The first giveaway is fantastic...cupcake related...
you want it...I know you do!
Invite your friends.

Wednesday, April 28, 2010

For all of my Funambulists out there!


Taylor Swift is cute, but her lyrics don't compare to real life love stories.
 I think this is a tad bit more accurate!
~ IT IS WORTH WATCHING~

Tuesday, April 27, 2010

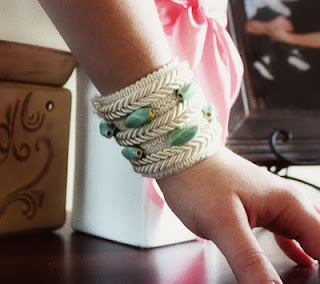
bohemian chic bracelet

NEEDS:
Felt
Cording- 1 yd.
Velcro
Beads

Its a little different, I know. But its bold and different. So I like it.
EASY too.
                                                                                       
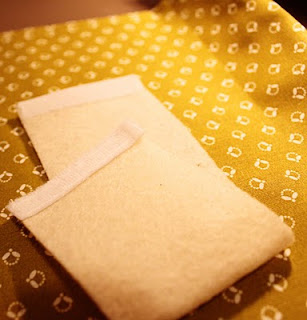
Begin by measuring your wrist. Cut the length and the width of the felt according to the width of the cording.
Cut two small pieces of velcro for the ends of the felt. Sew the velcro to the end of one side, and on the opposite end of the other side- so when you fold it around your wrist, the right sides of the velcro meet.
Then sew each of the cording pieces side by side. I actually thought about leaving it without the beads, but after I put the first one on, I knew I liked it. Thats all!

Monday, April 26, 2010

Good boy/Good girl dollars.

This May we are taking our kids to "A Day Out With Thomas." As an incentive for them to be good boys I decided to give them incentives in the form of these fun little bills.
We made each of them a little bank (out of fruit snack boxes) covered in Thomas the Train wrapping paper and thier names on them. Every time they are caught doing something GOOD they get a Thomas Dollar. Whatever they earn in Thomas Dollars, we will match at the Toy Tent during the "DOWT" event. So far, I have seen my 4 year-old empty the dishwasher, make his bed and gave me a back rub all for the sake of earning some of these precious greenbacks. Maybe it will work for you?

Click on the image, right click and save.
Disney Dollars (great for Disneyland or the Disney store)
(STAR WARS Request for Annie, thanks for the email!)
If there is a specific dollar you are looking for- leave me a comment and I'd be happy to create one for you.
(pretend bills only here folks, I'm not a U.S. Mint)

2: 8 minutes of yum.

Sunday, April 25, 2010

I heart my Camera strap.

I love my Canon Rebel T1i.
I hate the strap on my Canon Rebel T1i.

NEEDS:
2 coordinating fabrics cut to the size of your strap
(my strap was cut to a 2.5 inch X 27 inch dimension)
Begin by sewing right sides together with 5/8" seam allowance. Sew down both sides until you have an inside out tube of fabric.
Turn the tube right sides out and slide on to the camera strap.
I just tacked down the ends, put a hand stich to close the ends.
Nothin' fancy here folks.
Much more neck and fashion friendly.

Friday, April 23, 2010

8 minute cake. amazing.

I gotta give credit to Marisa Nielsen and her family for sharing this incredible idea. And wherever she learned it from, kudos to you..and whoever you learned it from...etc. This is ABSOLUTELY one the best inventions in the history of cake making. Once you try it- you'll never look at a cake mix, tub of frosting, bowl and microwave the same! Here we go!
NEEDS:
Cake Mix (any flavor)
Tub of frosting (that compliments your cake)
Oil
Eggs
Water
Lg. microwave safe plastic bowl
Large cookie sheet (with a brim- think sheet cake pan.)
Little brother in picture, optional.
(he was used in the making of this cake, to prove that ANYONE can do this.)

Step 1: make the cake according to the directions on the back of the box. Mix in the plastic bowl.
Step 2: Empty the container of frosting directly into the middle of the cake batter, as shown:
                                                   
Step 3: Put it in the microwave for 8 minutes.
Step 4: Behold the glory of what comes out of the microwave....Mmmmm! Let it sit for about 2 mins.
Step 4: Place the cookie sheet on top of the bowl and invert.
 (that means flip over)
Step 5: Lift bowl. Careful- steam is HOT.
Step 6: Marvel at the awesomeness, smell the incredible aroma, shove other guests out of the way and move in with intent to eat and destroy- fork in hand.
I hope the 8 minute cake brings as much joy to your family as it has to ours. We pretty much make them every weekend. Yep. Get r done. Our favorite flavor combination is Devils food cake with Cream Cheese Frosting. Others have raved about the Lemon cake with Vanilla. It's your cake. Party on.

Tuesday, April 20, 2010

Garden cupcakes

This is how mine grows!
Are you ready for this insane cupcake tutorial...
And Happy Birthday to Nicole Revill, I made these for her!

Ready or not...here it comes.

NEEDS: (short list)
Cupcakes- duh.
1 tub of vanilla frosting (avoid whipped)
1 tub of chocolate frosting
2 cups of cookie crumbs or smashed chocolate sprinkles
1 cup of cornflakes ( I used special K)
Green & white airheads
Large bag of starbursts (you need the red & orange)
Medium bag of M & M's (you need the green ones *wink*)
1 tablespoon of ground cinnamon
toothpick

Here we go. Start off my cooling your cupcakes, frosting them with chocolate frosting and then roll the tops in smashed cookies. Set them aside, let your inner candy artist come to life!
I started with the "lettuce cupcakes" begin by taking 1/2 cup of vanilla frosting and heat it in the microwave for 5 seconds, 2 times, stirring in between. Add green food coloring. Mix in the cereal and coat each flake well. Once they are coated, spread them out on a plate lined with wax paper. Set them in the frige for about 10 mintues to set up.
Take 4 of your frosted cupcakes and place 1 green M&M in the center of the cupcake. You will work from the inside out, forming almost a rose like pattern around the candy. Stick the coated cereal into the cupcake frosting until you have made the head of lettuce. Repeat 4 times. Save the remaining lettuce leaves for the rest of the project.                   Pretty much the cutest thing ever.
I then began the carrots...oh my heck...painfully easy and SO cute. Take the Starburst and split it into 2 even pieces. The small pieces will make the baby carrots. Roll in your fingers until you like the shape. The large carrots are made with one full Starburst. Do the same, mold the shape. Then- take a toothpick and make indents on the candy- I made a few fun holes too. Once you have the wrinkles in your carrot, roll it in the ground cinnamon! It gives it that fresh out of the dirt look. Take one of your coated cereal pieces and add it to the top to make the carrot greens.    Pretty much the cutest thing ever.
The Radish is next! Start by taking the red Starburst, one full piece, roll it around till it forms a radish looking ball (hah, thats funny. Rad-ish looking..okay, focus Amy.) Then once it is formed, dip the skinny end into a little bit of vanilla frosting. Add another lettuce leaf and you're done! So easy! The potato was something I came up with- roll the white airhead into a little potato shape and repeat the "dirting technique" that was done on the carrot. Indent and roll in cinnamon. Pretty much the cutest thing ever.
(I know the proportions are totally off. who cares. its a vegetable on a cupcake)
LAST but certainly not least- the PEAS!
Cut the green Airheads into a oval shape, enough for 4 M&M's. I found that the M's weren't sticking to the airhead, so I ran my finger under some water and then along the edge that I was sticking the M's to. It worked like a charm and they stayed in place. Then fold the oval over, mush the ends together and you have...pretty much the cutest thing ever.
Once you have all of your vegetables created, start putting them on the cupcakes! Again, I ran into trouble getting them to stick to the crushed cookies/sprinkles, so I used a little chocolate frosting "glue" and they stuck on great. Last step was making the cute garden marker signs. Necessary? No. Cute? Yes.
** BIG ANNOUNCEMENT**
Like the cupcakes?? Want to know where the inspiration came from??
Lets get 100 followers and a giveaway with the idea is up for grabs!!
Invite your friends!

Monday, April 19, 2010

mod podge and styrofoam.

This is the tray that sits under the t.v. It used to be filled with a variety of decor balls, but as children develop their throwing skills- the amount has dwindled. I keep looking for the perfect addition, but just haven't put my finger on what I wanted. Until today!
NEEDS: Mod podge, sponge brush, styrofoam balls in desired size, fabric and a well ventilated area...trust me.

Begin by coating the ball in mod podge and allow it to dry. Fabric doesn't stick well to styrofoam. :D Then cut the fabric into the size that best fits the surface. Then cover it completely with fabric & mod podge. Overlap the pieces of fabric until the entire ball is covered. I then tied a ribbon around the center as an accent and then with some twine to tie it in.
Ahhh. Much better.

Tank top tip.

Picture courtesy of Quentin Bacon
No more worries of your tank tops and undershirts falling off the hanger. Put two rubber bands on either side and watch those tops stay on the hanger forever...or until you want to wear one.
I found this super helpful tip in Family Circle magazine. Who knew?

Sunday, April 18, 2010

lovin me some shortbread.

I love shortbread cookies...as my jean size can attest. These are super simple -the rolling out part is kind of a pain, but the end result makes all the flour and rolling worth it.
NEEDS: 
1 & 1/2 cup butter at room temperature
1 & 1/3 cup powdered sugar
1 tbsp. vanilla extract
2 & 2/3 cups all-purpose flour
Granulated sugar for decorating, I also put on a dash of cinnamon.

Beat butter, powdered sugar and vanilla. Gradually beat in flour until well blended. Divide dough in half; flatten each half into a disk and wrap each of them in plastic wrap. Refigerate for about 2 hours. Preheat your oven to 325 degress. On a lightly floured surface, with a floured rolling pin, roll half of the dough to 1/4 inch think. Cut with desired cookie cutter. Place 1 inch apart on an ungreased cookie sheet and sprinkle with sugar (cinnamon if you want). Bake 9-10 minutes until they look yummy and desireable. Once the cookies are out of the oven, lift the edges with a fork and transfer them to a cooling rack. * As you roll them out, gather scraps and roll out again. If the dough becomes too soft, re-wrap it in plastic wrap and put back in the fridge. Yield 4 dozen. (just a note- I only got about 3 dozen. I made a 3 inch circle cookies...so plan on getting less that what the recipe says. Someone is a math major like me.)


I didn't have a cute plate to take to my brothers dinner party- so I grabbed a rubbermaid container and wrapped it in a brown paper bag. Tied it off with a bow and off we went. Later we took the remaining cookies on a walk and delivered them to neighbors- in style.

Saturday, April 17, 2010

First aid kit, a go go.

Do you have room for this in your purse? If you do, we need to talk.
If not- then I have the perfect solution!
I grabbed the essentials out of our kit, inculding some pain killers and found an old change purse that I bought at Wal-Mart for a $1.00! I put all the items in the convenient dividers and WALLA! Instant mini first aid kid that fits nicely in my purse. I took the card our of the clear pocket in the back and wrote down our important contact numbers, blood types and allergies- just in case!

Salvage yard? YES YOU CAN.

This a just a teezer for the fun ideas coming your way.
This antique window frame was found in a salvage yard. All glass intact- LOVE IT. I brought it home, scrubbed it down with some clorox water, coated it with polyurethane and printed off 10 pictures in black & white. It makes me smile everytime I look at it.

Wanna know where this incredible salvage yard is? Stay tuned to find out!

Friday, April 16, 2010

Necklace makeover

A long, long time ago I purchased a cute necklace at a yard sale for $.10. It traveled with me to the beautiful island of Hawaii and I wore it once. It had the feel of the tropics and looked great with my hibiscus print dress. I would recommend wearing this to a luau, but probably not anywhere else.  That poor necklace has been hidden in the shadows of my jewelry box for quite some time.
But no longer...

NEEDS: Old necklace with no purpose. Double the length in a fun fabric and have enough to wrap around the necklace twice. Some thread that matches the fabric.


Begin by rolling the necklace into the fabric and pin it to hold it in place. Start wrapping thread around each ball, starting at the middle and working out. Tie double knots to ensure durability. Continue alternating from one side of the center to the other until the necklace is finished. I think it's pretty cute. It kinda has a Wilma Flinstone vibe... I think it would be adorable paired with a silk flower just like this one.