Showing posts with label baking. Show all posts

Tuesday, April 26, 2011

"Mums the Word" Cupcakes!


With Mother's Day and hopefully some decent Spring weather coming...I thought these little beauties would be perfect! They do take some time, but are very simple once the busy work is done.

NEEDS:
12-24 cupcakes
white frosting
1 bag, mini marshmallows
food coloring
sugar
good (very clean) kitchen scissors

You will begin by cutting the mini marshmallows, across the diagonal of their shape. Creating a petal like formation.You will need about 22 cut mallows for each cupcake. Only cut 3-4 at a time, because they begin to dry out before you can dip them in sugar.
Press them sticky side down into colored sugar. (for a short cut, just put a few drops of food coloring into regular white sugar and mix with a fork till blended) I used, yellow, green and pink.
You will repeat this step...a lot!
Once you have all petals, in all desired colors, begin frosting your cupcakes with a normal amount of frosting. Work cupcake by cupcake so the frosting doesn't dry out. Start by arranging the petals in the middle and work your way out! Super simple and because nature isn't perfect- you don't have to be either! I added a nonpareil mint chip for the center, but you could really use anything cute!

Monday, November 8, 2010

Milky Way Mug Cake

If you're familiar with my 8 MINUTE CAKE...you're going to LOVE this one! Its fun, simple and the kiddos will love being able to make their own miniature cake!
NEEDS:
1 medium egg
2 tsp. vegetable oil
1 T. water
1/3 Cup Chocolate (dry) cake mix
Milky Way 'minis' or half of one full candy bar.


Begin by chopping up the candy bars into small chunks. Combine the dry ingredients in one bowl and set aside. In another bowl, combine wet ingredients and mix well.  


Combine all ingredients into one bowl and then pour into the mug. Microwave on high for 1 minute 30 seconds. Serve immediately!

Saturday, July 3, 2010

FOUR!! Golf course cupcakes

My husband is an avid golfer (to say the least).
When I asked him what fun cupcakes I should make for our family celebration today (4th of July, WHOO) he jokingly said..."Hmmm. a golf course." Well here you go, Mr. Jokester...with a bunker included.
Happy 4th of July everyone!!

These are actually easier than you might think. Really!

NEEDS: 24 Regular sized cupcakes in green liners.
1 tub of vanilla frosting
10 Nilla wafers (crushed)
Green food coloring
Green gift shred (for the sides, optional)
Chocolate golf balls (found at Partyland)

Frost 6 cupcakes with white or tan frosting (to make tan, mix 1 Tablespoon cocoa powder and 2 drops of yellow food coloring.) Then dip the tops into the crushed Nilla Wafers.
Frost 7 cupcakes with green frosting, then dip tops into green decorating sugar. Arrange ALL of the cupcakes now, in the pattern you would like your course to look like.
Tip the rest of the cupcakes with tinted green frosting- leaving peaks after each stroke to mimic grass. Fill in the gaps in between the cupcakes with frosting.
Once you are finished piping, add the chocolate golf balls, stick a flag near the hole (made out of a junior mint)
GRAB YOUR CADDY AND ENJOY!

Sunday, June 6, 2010

Cake mix brownies!


I have been M.I.A this past week! Summertime is here with a vengeance- traveling, vacations and family time have just about consumed our lives! I took a break today and experimented with a few "Cake Doctor" recipes...this one is so delicious and a combination of 2 recipes. My husband ate a huge piece before it even cooled off! Needless to say- it is fantastic! ENJOY!

NEEDS:
1 white cake mix (box)
2 eggs
1/3 cup oil
1 cup chocolate chips (I like semi-sweet)

Mix the ingredients in a mixing bowl, lightly grease a 9 X 13 pan, spread mixture into pan and bake at 350 degrees for 15 minutes. These are fantastic and SO EASY!
Ahhh. Feels good to be back!!! And did you see the followers!! Totally met the goal! Thanks everyone!

Saturday, May 22, 2010

Who wants some PIE?

Blue and Red M&M's, vanilla frosting with 4 drops of yellow food coloring and 1 1/2 Teaspoons of unsweetened cocoa. Thats all you need to make these adorable mini pies. A huge hit and so dang adorable...it should be a crime to eat them!! Other cute cakes: Chicken dinner cakes & Garden cupcakes

Friday, April 23, 2010

8 minute cake. amazing.

I gotta give credit to Marisa Nielsen and her family for sharing this incredible idea. And wherever she learned it from, kudos to you..and whoever you learned it from...etc. This is ABSOLUTELY one the best inventions in the history of cake making. Once you try it- you'll never look at a cake mix, tub of frosting, bowl and microwave the same! Here we go!
NEEDS:
Cake Mix (any flavor)
Tub of frosting (that compliments your cake)
Oil
Eggs
Water
Lg. microwave safe plastic bowl
Large cookie sheet (with a brim- think sheet cake pan.)
Little brother in picture, optional.
(he was used in the making of this cake, to prove that ANYONE can do this.)

Step 1: make the cake according to the directions on the back of the box. Mix in the plastic bowl.
Step 2: Empty the container of frosting directly into the middle of the cake batter, as shown:
                                                   
Step 3: Put it in the microwave for 8 minutes.
Step 4: Behold the glory of what comes out of the microwave....Mmmmm! Let it sit for about 2 mins.
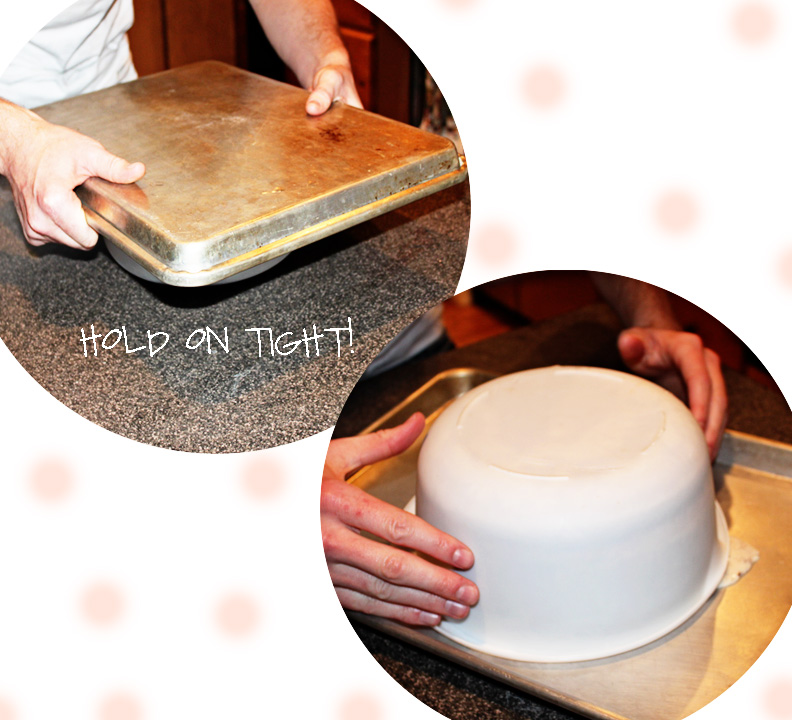
Step 4: Place the cookie sheet on top of the bowl and invert.
 (that means flip over)
Step 5: Lift bowl. Careful- steam is HOT.
Step 6: Marvel at the awesomeness, smell the incredible aroma, shove other guests out of the way and move in with intent to eat and destroy- fork in hand.
I hope the 8 minute cake brings as much joy to your family as it has to ours. We pretty much make them every weekend. Yep. Get r done. Our favorite flavor combination is Devils food cake with Cream Cheese Frosting. Others have raved about the Lemon cake with Vanilla. It's your cake. Party on.

Sunday, April 18, 2010

lovin me some shortbread.

I love shortbread cookies...as my jean size can attest. These are super simple -the rolling out part is kind of a pain, but the end result makes all the flour and rolling worth it.
NEEDS: 
1 & 1/2 cup butter at room temperature
1 & 1/3 cup powdered sugar
1 tbsp. vanilla extract
2 & 2/3 cups all-purpose flour
Granulated sugar for decorating, I also put on a dash of cinnamon.

Beat butter, powdered sugar and vanilla. Gradually beat in flour until well blended. Divide dough in half; flatten each half into a disk and wrap each of them in plastic wrap. Refigerate for about 2 hours. Preheat your oven to 325 degress. On a lightly floured surface, with a floured rolling pin, roll half of the dough to 1/4 inch think. Cut with desired cookie cutter. Place 1 inch apart on an ungreased cookie sheet and sprinkle with sugar (cinnamon if you want). Bake 9-10 minutes until they look yummy and desireable. Once the cookies are out of the oven, lift the edges with a fork and transfer them to a cooling rack. * As you roll them out, gather scraps and roll out again. If the dough becomes too soft, re-wrap it in plastic wrap and put back in the fridge. Yield 4 dozen. (just a note- I only got about 3 dozen. I made a 3 inch circle cookies...so plan on getting less that what the recipe says. Someone is a math major like me.)


I didn't have a cute plate to take to my brothers dinner party- so I grabbed a rubbermaid container and wrapped it in a brown paper bag. Tied it off with a bow and off we went. Later we took the remaining cookies on a walk and delivered them to neighbors- in style.

Tuesday, April 13, 2010

Flutter flies.

I'm sorry there isn't more tutorial journaling...I promise I will be better in future posts. Here is a simple and SUPER DUPER cute idea for cupcakes.

You will need:
White almond bark
Sm. plastic baggies (for piping)
Wax paper
Neon food coloring (found on the baking aisle)
Cake mix
30 minutes of total free creative mommy time.

I started out with cupcakes made to specifications on the box. Once they were cooled I frosted them with the bright green frosting (from a tub, thanks) I created with the coloring. Melt the chocolate, dye with the desired color, leave some white. Start piping your wing shapes onto the wax paper and fill in with white, edging the white to the colored brim with a tooth-pick.sprinkle with some nonpareils. Let them harden. Clear as mud? Good. Finish scribbling on some bodies and you've got some cute bugs to eat up.