Tuesday, November 23, 2010

NUTELLA. Need we say more?

Just made this as a trial run for the Holidays. Maybe a little too bold for the Thanksgiving crowd...but definitely bustin' it out for Christmas!! Mmmmm...I am now naming this "HOLIDAY SOUP."

4 cups light cream
6 ounces sweet chocolate
1/3 cup granulated sugar
1/2 cup Nutella
4 egg yolks
1/2 cup heavy cream, whipped, for topping
1/2 cup flaked, toasted hazelnuts, for topping

Combine cream, chocolate, sugar and Nutella in saucepan over medium heat, stirring until chocolate and Nutella have melted. Thoroughly beat egg yolks. Stir in 1/2 cup of chocolate soup mixture into egg yolks, then whisk egg yolk mixture into soup. Simmer, stirring for 5 minutes. Serve hot or cold, garnished with whipped cream and nuts. (I liked it hot....) Dip anything you want in it...graham crackers, bananas, shortbread, chocolate chip cookies...pretty much anything already loaded in sugar and pure awfulness. INDULGE!

Saturday, November 13, 2010

Gourmet Grilled Cheese & 5 Can Chili (AMAZING)

Delicious. Tasty. Crispy. Melty. GOODNESS.
It is much easier than you think!

Key Words: Artisan bread, Cheesemonger, Butter
My oldest brother Shane is quite the imaginative chef. He and I will call each other and discuss recipes, the latest tips from Alton Brown and of course, 80's movies. We decided to get together and make a gourmet/hillbilly dinner.
That's right. Gourmet ingredients, with Hillbilly flare. 

Grilled Cheese: We selected a Roasted Garlic Artisan bread from Harmon's. 1 loaf, cut into 1 inch sections. 
Cheeses: We used a mild Fontina and a smoked Applewood Swiss imported from Denmark. Remove any wax and cut into thin slices. Then- its just old fashion grilled sandwich assembly after that. **NOTE** Artisan breads take longer to toast than regular bread. Cook on a low heat for 10-15 minutes and your cheese will melt perfectly, while your bread toasts evenly. These were AMAZING.


THE CHILI
Another special family member that gets MAD PROPS for this recipe is my sister-in-law Camillia (not married to Shane, but my other brother Bryce....she also likes to invent in the kitchen). She gave me this recipe years ago and it... by far... is the best homemade chili ever! AND it only takes 7 ingredients, 5 of which you just open and dump in a pot!

NEEDS:
1.5 Lbs ground beef. Browned, drained and seasoned with S&P.
1 can- Buch's chili beans in mild sauce
3 cans- Ranch style beans
1 4 oz. can- chopped green chili's
2 8 oz. can- tomato sauce
2 Cups salsa
1 packet of taco seasoning (not pictured, oops)

Brown meat, set aside. Open up all cans and dump contents into pot. Open taco seasoning. Add to pot. Add Meat. Stir. Let simmer for 20 minutes. EAT.

Does it get any easier than this!?!? NOPE!


To round out the evening I also made an incredible Chocolate Cake from
We watched the '3 Amigos' and laughed until we cried.
I highly recommend following this post to its entirety.
**You can find a Cheesemonger at most Harmon's grocery stores in Utah. Google your zip code and cheesemonger and see if that helps! Its not necessary to use one, but they KNOW CHEESE! They can help you make tasty combinations, let you try the cheese before you buy it and can give you specific directions to keep your cheese tasting great**.

Tuesday, November 9, 2010

No Turkey? No Problem!

If the thought of shoving a huge raw bird in your oven scares you- then we have a lot in common. Thankfully the extremely important and terrifying task of cooking the Thanksgiving centerpiece has not been given to me. As a detour from a traditional Thanksgiving, you might consider trying this incredibly tasty alternative...perfect for smaller family gatherings, or even a week night dinner if you have neighbors you want to impress!
I took this picture last Christmas Day. These birds looked and smelled amazing AND had a flavor that shouted "Compliments to the chef!"
1 tablespoon salt
2 tablespoons lemon-pepper
1 tablespoon dried basil
1 tablespoon poultry seasoning
2 tablespoons olive oil
6 Cornish game hens, about 1 1/2 pounds each, rinsed and dried thoroughly
1 green bell pepper, large dice
2 stalks celery, large dice
1 onion, large dice
4 oranges (cut and separated into sections leave the peel on)

In a small mixing bowl, stir together salt, lemon pepper, dried basil and poultry seasoning. Rub olive oil all over the hens and season each with the salt mixture. Place the hens on a baking sheet pan with plenty of space between them. You may need to use 2 pans. Loosely stuff the cavities of each hen with some green bell pepper, celery and onion and orange slices. Roast the hens in the preheated oven for about 1 hour or until an instant-read thermometer inserted into the thickest part of the thigh registers 165 degrees F and the juices run clear. Remove the hens from the oven, loosely tent with foil and let rest 10 minutes before carving or serving.


TIPS: Line the baking sheet pan with foil under the wire rack for an easy clean-up. The veggies and herbs stuffed in the cavities of the hens will impart flavor to the meat as it cooks. Be sure not to crowd the hens on the baking sheets or else the skin won't crisp up properly and they will take much longer to cook.

Bon Appetit!

Monday, November 8, 2010

Milky Way Mug Cake

If you're familiar with my 8 MINUTE CAKE...you're going to LOVE this one! Its fun, simple and the kiddos will love being able to make their own miniature cake!
NEEDS:
1 medium egg
2 tsp. vegetable oil
1 T. water
1/3 Cup Chocolate (dry) cake mix
Milky Way 'minis' or half of one full candy bar.


Begin by chopping up the candy bars into small chunks. Combine the dry ingredients in one bowl and set aside. In another bowl, combine wet ingredients and mix well.  


Combine all ingredients into one bowl and then pour into the mug. Microwave on high for 1 minute 30 seconds. Serve immediately!

Sunday, November 7, 2010

Its been far too long...

After nearly a 3 month absence...we are back and ready for the holidays!
Get Ready.
Get Set.
Go!

Tuesday, August 17, 2010

Be our guest!!

Boy when you see talent and creativity like this- you just gotta share the love! I first met this incredible designer, Jenny a few years ago. I was so impressed with her creative ablilities- she makes her own clothes and does a dang good job at it. She has an etsy shop and I wanted to show off some of her amazing creations! Enjoy!

Check out the rest of Jenny's awesomeness!

Tuesday, July 27, 2010

Egg Carton craft...to die for!

I thought this was TOO STINKIN CUTE to pass up! Thought I would share the idea...

Head on over to SIMPSONIZED CRAFTS & THEN SOME for complete instructions...SO FUN! I am offering my apologies well in advance...but with my recent run of morning sickness- I'm lucky if I get my hair brushed and clothes on before noon. Once I'm feeling better, I hope to execute and post the ideas I've had lately! Fingers crossed!

Wednesday, July 21, 2010

dollar store apron revamp!

My boys both earned enough gold stars to visit the dollar store! Hooray for them! While wondering through the aisles of cheap and what I like to call "2 minute toys" (they break in that amount of time) I spotted a semi-cute, full of potential apron! I grabbed it and immediately started planning what I could do to make it...well you know...CUTE!
Forgive me for putting my 4-year-old boy in a pink apron with a butterfly on it.
Basic 1st layer to cover the up the butterfly.
Overlap with another layer to form a pocket.
Add some rick-rack to finish the edge and throw on a hand made flower for
even more added cuteness. Finished with a bright yellow button!
My cute model, Maggie!

Friday, July 16, 2010

Reward Charts!

Last weekend at my brothers home, I noticed the coolest reward chart my sister-in-law made! After trying to replicate the same chart they had, I just decided to do my own...I am not as savvy with Microsoft Office as my awesome sis-in-law- you rock Krista! But from her idea, I was inspired to create charts for the boys. Son #1 obviously obsessed with Star Wars and son #2 just had to have a Cars themed chart. I think they turned out pretty well! They've each already earned 2 gold stars by wiping down the leather couch and cleaning their rooms. How is that for child labor?!


Send me an email if you are interested in a customized chart for your little person!

Saturday, July 3, 2010

FOUR!! Golf course cupcakes

My husband is an avid golfer (to say the least).
When I asked him what fun cupcakes I should make for our family celebration today (4th of July, WHOO) he jokingly said..."Hmmm. a golf course." Well here you go, Mr. Jokester...with a bunker included.
Happy 4th of July everyone!!

These are actually easier than you might think. Really!

NEEDS: 24 Regular sized cupcakes in green liners.
1 tub of vanilla frosting
10 Nilla wafers (crushed)
Green food coloring
Green gift shred (for the sides, optional)
Chocolate golf balls (found at Partyland)

Frost 6 cupcakes with white or tan frosting (to make tan, mix 1 Tablespoon cocoa powder and 2 drops of yellow food coloring.) Then dip the tops into the crushed Nilla Wafers.
Frost 7 cupcakes with green frosting, then dip tops into green decorating sugar. Arrange ALL of the cupcakes now, in the pattern you would like your course to look like.
Tip the rest of the cupcakes with tinted green frosting- leaving peaks after each stroke to mimic grass. Fill in the gaps in between the cupcakes with frosting.
Once you are finished piping, add the chocolate golf balls, stick a flag near the hole (made out of a junior mint)
GRAB YOUR CADDY AND ENJOY!

Thursday, June 24, 2010

Accordian Sandwich- so summertime!

This is such a fun and simple meal option- we gobbled it right up! (makes about 6 servings)
NEEDS:
1 loaf french bread
cheese
meat (I used ham, turkey & pepperoni) 1/2 lb each.
mustard spread (I used dijon)
onion
Begin by slicing the bread in one inch sections, but do not cut all the way through. You are creating a 'pocket' for the meat, so do not actually make slices. In the picture, you will notice arrows indicating the sections of bread you will "stuff." The 2 end pieces can be thrown away.
In every other 'pocket' you will spread your mustard and begin stuffing the bread with your desired selections. For this go-round, I used shredded cheese, onions, & meat. You can certainly come up with your own combinations!
Once you have the bread completely stuffed, set the oven to 200 degrees. Bake the sandwich until the cheese is melted (about 10 minutes) Another twist to heating the sandwich would be to wrap it in tin foil- before stuffing and set it on the grill for 10 minutes...VERY yummy....
Once the cheese is melted, you can stuff with lettuce and tomato and any additional condiments you wish!
Fully slice the sections of sandwich and enjoy! My next try- the Accordian Club. Did someone say bacon?

Saturday, June 12, 2010

Luggage revamp!

So. Here I am, Saturday afternoon and I have to leave on my "trip" on Monday. Its raining and I don't want to go shopping for luggage. I had the most adorable matching set of pink luggage that we bought when we went to South Africa 3 years ago, but in the grand tradition of dirty cargo space in the bottom of our 3 planes- when I got home the luggage was BLACK! I was so sad! Since then, I have just used my husbands really nice, sturdy luggage he was given from a company he used to work for. I love the luggage, I HATE the branding on the front.
So this was my husbands suggestion to me today. "Just cover it up with some of your flower thingies."
Thank you Jason! Problem solved!

Sunday, June 6, 2010

Cake mix brownies!


I have been M.I.A this past week! Summertime is here with a vengeance- traveling, vacations and family time have just about consumed our lives! I took a break today and experimented with a few "Cake Doctor" recipes...this one is so delicious and a combination of 2 recipes. My husband ate a huge piece before it even cooled off! Needless to say- it is fantastic! ENJOY!

NEEDS:
1 white cake mix (box)
2 eggs
1/3 cup oil
1 cup chocolate chips (I like semi-sweet)

Mix the ingredients in a mixing bowl, lightly grease a 9 X 13 pan, spread mixture into pan and bake at 350 degrees for 15 minutes. These are fantastic and SO EASY!
Ahhh. Feels good to be back!!! And did you see the followers!! Totally met the goal! Thanks everyone!

Tuesday, June 1, 2010

A tip from our Financial Funambulist!

I thought it would be fun to ask guest contributors to share insight and tips for things we all deal with in life. Because we face a world of economic uncertainty- we need to make sure we have taken the steps necessary to protect our families. This particular issue has been on my mind lately and I wanted to share with each of you some tips and "know how's" from Silverline Financial.
Guest contributor (and my wonderful, handsome and wicked smart husband) Jason Rasmussen, Owner of Silverline Financial, chimes in with a few
FREQUENT Q&A:
Q.What is the difference between term & permanent life insurance?
A. I believe there is a time and situtaion fitting for both types of insurance. I personally own both kinds of policies. Term Life Insurance is designed to provide protection for a specified period of time. Though the policy does not accumulate cash value, if you have a temporary need for life insurance or are on a limited budget, term insurance may be the best option for you. Term Insurance is very inexpensive and is a cost effective way to protect your family. You simply pay your monthly premium and the life insurance promises to give your family the amount in the death benefit if you should pass away. Term Insurance usually has a set premium time period, for either 10, 15, 20 or 30 years. I personally believe everyone should have some kind of term insurance, in the event of a death.
Permanent Life Insurance has many different 'names' and options. The basics behind a permanent policy is to pay enough in premiums so that the policy is fully funded and there is no need to pay premium amounts into the policy. The policy is purchased by paying the premium for a set period of time. These policies have become more flexible and easier to work with into what you want accomplished. Because permanent policies are complex and wide spread, you should contact your Financial Specialist for more information.
Q: What are the major reasons to own a life insurance policy?
A: Studies have shown that the average American does not "like" to worry about death, retirement or disability (shocking, I know) But the fact of the matter is- you never know when life could change and being prepared with life insurance is the safest bet you have in the event something does happen. Besides offering major tax benefits, life insurance is the only investment I have felt 100% confident in. Its never too late to start investing in your future. As my motto says, "Plan today, for a prepared tomorrow."

Best regards,
Jason

Friday, May 28, 2010

AND THE WINNER IS.....

 From Arizona...
CAROL ANN GUTHRIE!!
Which is very exciting for me...Carol has been a faithful follower and has made lots of the ideas shown on the Funambulist Damsel! She is a mother of one sweet little girl, has a wonderful husband and one cat named Sparticus. I know the random.org randomizer made a good choice!Carol will receive the ultimate cupcake lovers decorating guide book, Hello Cupcake! Thank you to the publishers of this awesome book for donating a copy for our giveaway!

And for everyone else who follows the blog, leaves comments and offers so much support I say THANK YOU and I look forward to sharing many more fun giveaways and ideas!

Tuesday, May 25, 2010

A fantastic day for the Funambulist!!

Thank you everyone so much for becoming a follower to this crazy little blog. I have had such a great time creating, sharing new ideas, visiting the 2,456 other craft blogs that exist in the world...It's great!
Please leave a comment on THIS POST so you can be entered in the FIRST giveaway!!
As promised- enter to win a cupcake "all inspiring" page after page book of AMAZINGNESS!
THANK YOU AGAIN!
Winner will be selected using random.org number generator on Friday, May 28th!!
(way to be totally honest my peeps)

Monday, May 24, 2010

Homemade Crustos!

Derived from our favorite fast food taco place- Taco Time, I thought I would share the most simple Crustos recipe known to man. SIDE NOTE:  Contrary to what my brother-in-law Stevie thinks, Crustos are served at all Taco Time establishments and not just the one in Price, Utah. This one's for you Stevie! :D
NEEDS: 1/4 Vegetable oil (or canola oil)
Flour tortillas
Cinnamon & Sugar
Frying pan
Begin by cutting your tortillas in fourths (or strips if you desire) and set them aside. Heat the oil in a frying pan. (I used a small pan, so 1/4 cup of oil was all I needed- bigger pan...use more oil) TIP- heat your oil on high, you want them to brown fairly quickly to avoid the tortilla soaking up the oil. If you fry them fast, they will crisp instead of turn soggy. Place the tortilla in the hot oil. Have tongs in hand, so you can flip quickly and easily. Brown on both sides and place onto a plate covered in paper towel. Immediately sprinkle with a generous helping of cinnamon and sugar. Repeat the process until all the tortillas are done. Even our picky, picky 4 year old scarfed these fry puppies up!! Enjoy!!

Saturday, May 22, 2010

Who wants some PIE?

Blue and Red M&M's, vanilla frosting with 4 drops of yellow food coloring and 1 1/2 Teaspoons of unsweetened cocoa. Thats all you need to make these adorable mini pies. A huge hit and so dang adorable...it should be a crime to eat them!! Other cute cakes: Chicken dinner cakes & Garden cupcakes

Thursday, May 20, 2010

Link Party #2

Join the link party! Enter whatever you want..your ideas, someone else's ideas, old ideas, ideas you want to try...it really doesn't matter. Let everyone see what you are currently gushing about!

Wednesday, May 19, 2010

Swimsuit revamp #2

It is amazing to me, what you can do with a dollar and some scraps. I recently revamped my own inexpensive swimming purchase- Swimsuit revamp #1. And loved how it turned out. I thought this was worth a try as well.
I found this simple purple (looks pink from my phone camera) at the Dollar store. It is a 18-24 month, perfect for my cute niece having a birthday! I started out by adding a ruffle, much like the first swimsuit revamp, but on a much smaller scale.
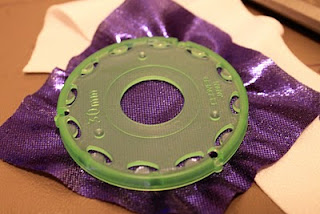
I then made 3 small metallic yo yo's. I had some of this fun fabric in the big bags of fun I got from my grandmother. I'm certain it is from 1987. If you are curious what the yo yo makers look like- here ya go.
Top side of the Yo Yo makers (http://www.nancysnotions.com/)
Bottom side
Add the 3 small flowers to the neckline and the suit is ready for some serious fun in the kiddy pool!

Sunday, May 16, 2010

Tiny Yo-Yo's...oh so cute.

My mom bought me the coolest thing(s) for Mothers Day! An entire set of Yo Yo templates. They take the guess work out of making these fun and fabulous creations in all sorts of sizes!
They are popping up everywhere...and now I can make them all day long if I want to!
I used the smallest yo yo maker template and created the smallest little flowers. My dear friend Renita is celebrating her birthday and wears clip-on earrings. So I fashioned her 2 pairs of custom ones!
The first set is a delicate pink satin with rhinestone centers.
The other was done in her favorite color, green with pearl centers. I also made a yo yo pin to match the green but didn't get a picture, trust me- it was cute! The possibilities are endless!
If you want to order your own yo yo maker(s) set, here is the website my mom ordered them from.