Friday, May 28, 2010

AND THE WINNER IS.....

 From Arizona...
CAROL ANN GUTHRIE!!
Which is very exciting for me...Carol has been a faithful follower and has made lots of the ideas shown on the Funambulist Damsel! She is a mother of one sweet little girl, has a wonderful husband and one cat named Sparticus. I know the random.org randomizer made a good choice!Carol will receive the ultimate cupcake lovers decorating guide book, Hello Cupcake! Thank you to the publishers of this awesome book for donating a copy for our giveaway!

And for everyone else who follows the blog, leaves comments and offers so much support I say THANK YOU and I look forward to sharing many more fun giveaways and ideas!

Tuesday, May 25, 2010

A fantastic day for the Funambulist!!

Thank you everyone so much for becoming a follower to this crazy little blog. I have had such a great time creating, sharing new ideas, visiting the 2,456 other craft blogs that exist in the world...It's great!
Please leave a comment on THIS POST so you can be entered in the FIRST giveaway!!
As promised- enter to win a cupcake "all inspiring" page after page book of AMAZINGNESS!
THANK YOU AGAIN!
Winner will be selected using random.org number generator on Friday, May 28th!!
(way to be totally honest my peeps)

Monday, May 24, 2010

Homemade Crustos!

Derived from our favorite fast food taco place- Taco Time, I thought I would share the most simple Crustos recipe known to man. SIDE NOTE:  Contrary to what my brother-in-law Stevie thinks, Crustos are served at all Taco Time establishments and not just the one in Price, Utah. This one's for you Stevie! :D
NEEDS: 1/4 Vegetable oil (or canola oil)
Flour tortillas
Cinnamon & Sugar
Frying pan
Begin by cutting your tortillas in fourths (or strips if you desire) and set them aside. Heat the oil in a frying pan. (I used a small pan, so 1/4 cup of oil was all I needed- bigger pan...use more oil) TIP- heat your oil on high, you want them to brown fairly quickly to avoid the tortilla soaking up the oil. If you fry them fast, they will crisp instead of turn soggy. Place the tortilla in the hot oil. Have tongs in hand, so you can flip quickly and easily. Brown on both sides and place onto a plate covered in paper towel. Immediately sprinkle with a generous helping of cinnamon and sugar. Repeat the process until all the tortillas are done. Even our picky, picky 4 year old scarfed these fry puppies up!! Enjoy!!

Saturday, May 22, 2010

Who wants some PIE?

Blue and Red M&M's, vanilla frosting with 4 drops of yellow food coloring and 1 1/2 Teaspoons of unsweetened cocoa. Thats all you need to make these adorable mini pies. A huge hit and so dang adorable...it should be a crime to eat them!! Other cute cakes: Chicken dinner cakes & Garden cupcakes

Thursday, May 20, 2010

Link Party #2

Join the link party! Enter whatever you want..your ideas, someone else's ideas, old ideas, ideas you want to try...it really doesn't matter. Let everyone see what you are currently gushing about!

Wednesday, May 19, 2010

Swimsuit revamp #2

It is amazing to me, what you can do with a dollar and some scraps. I recently revamped my own inexpensive swimming purchase- Swimsuit revamp #1. And loved how it turned out. I thought this was worth a try as well.
I found this simple purple (looks pink from my phone camera) at the Dollar store. It is a 18-24 month, perfect for my cute niece having a birthday! I started out by adding a ruffle, much like the first swimsuit revamp, but on a much smaller scale.
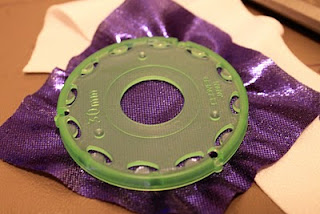
I then made 3 small metallic yo yo's. I had some of this fun fabric in the big bags of fun I got from my grandmother. I'm certain it is from 1987. If you are curious what the yo yo makers look like- here ya go.
Top side of the Yo Yo makers (http://www.nancysnotions.com/)
Bottom side
Add the 3 small flowers to the neckline and the suit is ready for some serious fun in the kiddy pool!

Sunday, May 16, 2010

Tiny Yo-Yo's...oh so cute.

My mom bought me the coolest thing(s) for Mothers Day! An entire set of Yo Yo templates. They take the guess work out of making these fun and fabulous creations in all sorts of sizes!
They are popping up everywhere...and now I can make them all day long if I want to!
I used the smallest yo yo maker template and created the smallest little flowers. My dear friend Renita is celebrating her birthday and wears clip-on earrings. So I fashioned her 2 pairs of custom ones!
The first set is a delicate pink satin with rhinestone centers.
The other was done in her favorite color, green with pearl centers. I also made a yo yo pin to match the green but didn't get a picture, trust me- it was cute! The possibilities are endless!
If you want to order your own yo yo maker(s) set, here is the website my mom ordered them from.

Thursday, May 13, 2010

Link Party Friday!

We are having a party...and YOU are invited! Every Friday, the Funambulist Damsel is having a link party! Its very simple and a BLAST to follow! Just click the "click here to enter" button, add your link, upload a picture and you're done! You can post from your Facebook, personal Blog, or website. We want to see all of the fun things you do- cooking, cleaning, photography, tips, good deals...you name it!  Every person that reads the Funambulist Damsel will get to see your creativity at work! I hope you will join our link party and enjoy the time you spend with us!

Half sweater re-vamp!

I have had this not so cute half white sweater in the back of my closet for quite some time. I seriously have never down worn it. SO...after my 6 am wake up call by child #2, I couldn't go back to sleep and decided to make something of this once upon a time purchase. With the help of ALL THAT FUN STUFF I recently inherited from my grandmother...I pulled out yards of lace and went to work. Again, I didn't take pictures of the "how to" but I started by adding a 7 inch piece of fabric all the way around the bottom of the sweater. Then sewed layer by layer of lace, until it was to the bottom. It is now long enough...and being worn today.
Upon my husband coming into the kitchen and seeing me in my newly crafted sweater...he said, "Very pretty honey, you look nice." When he asked where I got the lovely top- I gladly replied, "I made it!" He then followed up with "If you keep turning old clothes into new clothes, you'll never need to buy anything new!"

Simple men. They know nothing. ;-)

Rick rack and felt flowers

This was one of those "I have no idea where this is going..." ideas.
I just kept making flowers and eventually added them all to one simple, brown shirt.
I love it. It is simple enough, no tutorial needed. Just make some flowers, add some buttons and you're done.

Monday, May 10, 2010

Headband #1

I recently inherited bags full of lace, buttons, fabric scraps and rick rack...so be preapred for lots of posts with these items! I am so excited to get started on the fun ideas I have swirling in my head! First up, a simple lace and felt headband. I started off by sewing the lace to a piece of white felt. I then beaded it with seed beads and glass beads- and 2 rhinestones to finish it off. Attached it to the headband and ta da.
Not a bad project to work on while the hubby watches the playoffs.
(Go Suns!)

Friday, May 7, 2010

Tissue plate keepsake?

I seriously could not decide what to name this project. So...yeah.
This idea happened rather haphazardly. I LOVE this picture of my grandmother. It was taken when she graduated from college. She made the dress she is wearing and I remember staring at this picture when I was a little girl. My grandma King (Shirley) was (I guess, still is) and AMAZING seamstress. She graduated from BYU with a clothing design and family sciences degree. She is such a sweet lady and I wanted to honor her this Mothers Day.
I didn't know quite what to do.
I thought.
And thought.
Till I saw an old plate I had made a few years ago- which I never finished.
Mod Podge + Inspiration = this plate! Wahoo!
I simply covered the plate (which was purchased at Tai Pan, also seen at Wal Mart) applied a wrinkled sheet of tissue paper, re-applied Mod Podge, then firmly pushed the picture into place- smoothing out any bubbles. I let the plate dry and it was done! It looks really pretty in person, I don't think the picture does it justice. Hopefully its a treasure! Happy Mother's Day!

Tuesday, May 4, 2010

My first GUEST POST from GET CRAFTIN

Her name is ANA and she is
the chick behind Get Craftin'

She loves making things for her apartment, herself and others.
Ana is SO creative!
...you name it she loves creating!
She loves crafts that are probably girly- she loves headbands...
and jewelry...
...really just loves loves loves anything cute and feminine
especially if she can make it within her newlywed budget (which is not alot).
I'm going to share with you this easy and cheap tutorial
on what magic a little white paint can do!

So I found this little wood tray and the wood applique at our local thrift store.
Guess for how much each? Fifty cents!! I couldn't resist all this for a buck!
I just hot glued the wood applique unto the wood tray.
I had decided on white paint.
Have you seen all the fabulous stuff out there painted white?
I love it all, it gives it a modern but chic look i think!
So after a few coats of white paint i got this shabby piece...
Oh so wonderful, I love accessorizing our home with fun pieces like these.
As you can see here you can use it in so many different ways.
It can be a decoration piece or something you actually use
You could use it to store your jewelry, or your girly accessories
Here i used it as decor, and it works great!
Thanks Amy for letting me invade your blog.
I hope i can hear from you guys over @ Get Craftin!
Have a wonderful day!

Ana Paula from {GET CRAFTIN'}